UPDATE: 12/14/2025
It seems that installing Apple Bonjour Print Services help quite a bit when trying to ssh using a hostname. or example, if you set your gadget’s host name to mygadget, then using Bonjour Print Service, you would be able to use:
ssh user@mygadget.local
Instead of
ssh user@192.168.0.13
Before installing Bonjour, using <hostname>.local was always hit or miss with me. I would get frustrated and end up using the gadget’s IP address. You can download Apple Bonjour Print Service straight from Apple’s support website, this is recommended. Since apple hasn’t updated Bonjour since 2010, and it eventually may disappear, you can download it from this server (at your own risk). I downloaded it straight from Apple, and then placed it on my physically controlled server. It works on Windows 11.
Some tips on getting Pi Zero 2 W Ethernet/RNDIS gadget up and running.
Lately I’ve been tinkering around with the Raspberry Pi Zero 2 W, experimenting with these incredible little boards. A number of projects I have been playing with required the the Zero 2 to connect to a another computer via Ethernet/RNDIS mode. This has been a royal pain in the ass, and with much trial and error, I have finally succeeded more or less. Here I will share my experiences in hope that it will help others.
First, some caveats:
- We are only dealing with the Raspberry Pi Zero 2 W, I haven’t tried with a Pi Zero, Zero W, Zero 2.
- We will be connecting to a Windows 11 machine. I don’t own a Mac, and I haven’t tried with Linux. Also I don’t know if this will work with any version of Windows before 11.
- We will be using Raspberry Pi OS Lite (64-bit) Bookworm. I haven’t tried this with Bullseye, and I’ve never run Buster.
- You will need a good working knowledge of Raspbian/Raspberry Pi OS.
- You will need a good working knowledge of Windows operating system.
- I’m not responsible if you have any hardware or software issues after trying any of this. The Responsibility is on you.
Now with that out of the way…
Tip #1:
You will need to install the Ethernet/RDNIS driver for Windows 11. RNDIS stands for Remote Network Driver Interface Specification, it allows windows to see certain USB hardware (Gadgets) as ethernet devices. You can learn more about RNDIS at Microsoft. Below are two links to download the RNDIS driver. The first is from Microsoft’s own servers, the other is hosted on my server incase Microsoft’s link goes down.
https://modclouddownloadprod.blob.core.windows.net/shared/mod-rndis-driver-windows.zip
https://www.einherjar.org/wp-content/uploads/2025/01/mod-rndis-driver-windows.zip
Once you unzip it, you should see 2 files: RNDIS.cat and RNDIS.inf
Right click on RNDIS.inf and select ‘Install’. If a window pops up asking ‘Do you want to allow this app the make changes to your device?’, click ‘Yes’ (if you click on ‘Show more details’, it will show you the the verified publisher is Microsoft Windows, and you can also check the publisher’s security certificate.)
Afterwards a little window should pop up saying everything was successful. You shouldn’t need to reboot your computer, but it wouldn’t hurt either. Windows now should be ready.
Tip #2:
cmdline.txt & config.txt. The location of these files depends on how your accessing the SD Card with Raspberry Pi OS is installed. If you have the SD Card in a card reader on a windows machine, then the root directory of the drive named bootfs with contain both cmdline.txt and config.txt. You can edit it with whatever text editor you like (I recommend NotePad++) If you’re SSH’ing into your pi, then you can find the files in /boot/firmware. You can use MC [Midnight Commander – a command line, text based file manager] to navigate and edit the files, or use the following commands in a terminal:
sudo nano /boot/firmware/cmdline.txt
sudo nano /boot/firmware/config.txt
Open the cmdline.txt file and you should see something similar to:
console=serial0,115200 console=tty1 root=PARTUUID=7b568eea-02 rootfstype=ext4 fsck.repair=yes rootwaityou need to add modules-load=dwc2,g_ether at the end of rootwait. it should look something like this:
console=serial0,115200 console=tty1 root=PARTUUID=7b568eea-02 rootfstype=ext4 fsck.repair=yes rootwait modules-load=dwc2,g_etherPlease note that there is no spaces in modules-load=dwc2,g_ether. Save the file. Next open config.txt and you’ll get see something similar to:
# For more options and information see
# http://rptl.io/configtxt
# Some settings may impact device functionality. See link above for details

# Uncomment some or all of these to enable the optional hardware interfaces
#dtparam=i2c_arm=on
#dtparam=i2s=on
#dtparam=spi=on

# Enable audio (loads snd_bcm2835)
dtparam=audio=on

# Additional overlays and parameters are documented
# /boot/firmware/overlays/README

# Automatically load overlays for detected cameras
camera_auto_detect=1

# Automatically load overlays for detected DSI displays
display_auto_detect=1

# Automatically load initramfs files, if found
auto_initramfs=1

# Enable DRM VC4 V3D driver
dtoverlay=vc4-kms-v3d
max_framebuffers=2

# Don't have the firmware create an initial video= setting in cmdline.txt.
# Use the kernel's default instead.
disable_fw_kms_setup=1

# Run in 64-bit mode
arm_64bit=1

# Disable compensation for displays with overscan
disable_overscan=1

# Run as fast as firmware / board allows
arm_boost=1

[cm4]
# Enable host mode on the 2711 built-in XHCI USB controller.
# This line should be removed if the legacy DWC2 controller is required
# (e.g. for USB device mode) or if USB support is not required.
otg_mode=1

[cm5]
dtoverlay=dwc2,dr_mode=host

[all]
At the end, under [all], add dtoverlay=dwc2,dr_mode=peripheral. If dtoverlay=dwc2 already exists under [all], then just add ,dr_mode=peripheral. Again, note there are no spaces. It should looks like this:
[all]
dtoverlay=dwc2,dr_mode=peripheral
dr_mode=peripheral forces the PiZero 2W into gadget mode. This was the most frustrating part of trying to find out on how to get my Zeros into gadget mode. All tutorials would have the cmdline.txt information, and would have conflicting config.txt info. This is what works for me. Save the file, and reboot your Pi Zero 2W.
Tip #3:
USB Cables and Ports: This section is important and also gets a little weird on the windows end.
First off is your USB cable, make sure it’s a data enabled cable. A lot of USB cables that come with various devices are ‘Charge Only’, meaning that data can’t be sent through them. Plug the cable into your computer and connect a device like a phone or external drive; try to transfer a file to see if it works. If the file is sent through, then the cable supports data.
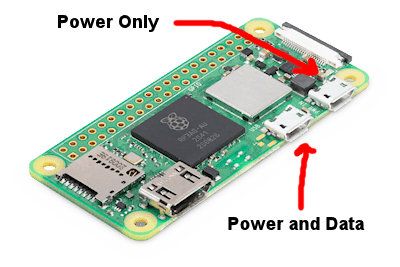
The Raspberry Pi has 2 Micro USB ports. The one closest to the edge of the board is only for powering the board. The Port closest to the HDMI port is for Data transfer, but will also power the board. This is the port we use to connect to our PC.

Window’s way of dealing with Ethernet/RDNIS gadgets is really strange. It’s doesn’t remember the specific gadget that was plugged in and configured. It only remembers WHERE a RDNIS gadget was plugged in and configured. When you plug a RDNIS gadget into a USB port on your computer and configure it, it is tied to that particular USB port. If you plug it into another USB port on the same computer, that port has to be configured now. Plug it back into the original port, and windows will load up the first configuration, plug it back into the second, and windows will load the second configuration. BUT, Windows seems to treat all gadgets as the same, so if I plug in a second different gadget into the first USB port, it will load up the config for the first gadget. For example:
I have a computer with 3 USB ports; USB1, USB2, USB3.
I have 2 Gadgets; Gad1 and Gad2
I put Gad1 in USB1 and configure it (Config1)
I put Gad2 in USB2 and configure it (Config2)
I put Gad1 in USB3 and configure it (Config3)
Now no matter which gadget I use, Windows will always load Config1 at USB1, Config2 at USB2, Config3 at USB3.
So while you can have multiple RDNIS gadgets plugged in at the same time on a single PC, you are limited by the number of USB ports you have. I don’t know if it can be expanded with a powered USB hub, but I do know that my cheap unpowered USB hub didn’t work. Also having multiple Ethernet/RDNIS gadget really seemed to impact my system, slowing it significantly. Not sure if was the strange network setup, or what, just be aware.
Tip#4
Detecting and configuring your gadget. After you’ve plugged in your Pi Zero into your PC and it’s booted up, open Windows Device Manager (type ‘Device Manager’ at the start menu). Click on ‘Network Adapter’. If you see ‘USB Ethernet/RNDIS Gadget’ (Sometimes with a number after it), then Windows has successfully connected to your gadget. If your project doesn’t explicitly ask you to manually assign an IP address, then you are done. Instead on an IP address to connect to your Pi Zero, just use <hostname>.local. <hostname> being whatever you changed it too when you installed Raspberry Pi OS. If you didn’t change the host name, then it defaulted to raspberrypi.
Now if the project you are working on requires you to manually assign an IP address in Windows to your gadget, open Windows Settings. Click ‘Network and Internet’, then ‘Ethernet. Next click on the Ethernet that corresponds with your Pi Zero (If your computer isn’t plugged into your router with a Network cable, it will be the only entry that says ‘Connected’).
Click the ‘Edit’ button next to ‘IP assignment’, choose ‘Manual’ from the dropdown box. Click the ‘IPv4’ slider to ‘on’. Fill in the IP Address, Subnet Mask, Gateway, and DNS settings. Then click ‘Save’, and now every time you plug in your gadget to that particular USB port, Windows will load this configuration. Congrats, you should now be able to SSH into your Raspberry Pi Zero 2W without it being connected to your wifi router. Try ‘ssh <username>@<hostname>.local’ in Windows Terminal
FINAL NOTE:
All of this really depends on multiple network configurations loaded in your Pi Zero. Most of the time this is taken care of when you install whatever project that has a gadget option. Double check the install notes. If the project is hosted on Github, double check the ‘Issues’ tab (both Open and Closed Issues) to see if your problem has been addressed or not. You can also check Reddit for guidance.
I sincerely hope this help others out.


You did a SUPER job writing this – you cleared up many items for me. I am using it as my royal PITA was trying to get it to be a web cam over USB. Looking back – this will be more stable as the IP will remain constant for my python app that is taking pics for AI (streaming an hq camera feed from the PI). Anyways – KEEP POSTING PLEASE – this really was the grounding that I needed. Other posts from geerlingguy are ALSO awesome but I think the 2021 last major updates are creeping in and things are significantly different. If anyone reads this post – BUT THE 2W because you can config the pi over wireless while you get this whole royal pain in the ass working (you could not have a better choice of words).
I’m glad it helped you out, it was driving me nuts too. When I finally got it working, I figured I would share (and also be able to remember later, I’m 52 and the ‘ole brain ain’t what it used to be).